
[Tutorial] The Ultimate Guide to Configuring Facebook Dynamic Retargeting Ads
Many moons ago, Facebook rolled out a very powerful ad feature that used to be an exclusive (e.g. very expensive) advertising option on nearly all other large advertising platforms. That feature was dynamic product retargeting ads.
If you're unfamiliar with what dynamic retargeting ads are, here's the skinny.
The Skinny On Dynamic Retargeting Ads
Retargeting Ads, in general, are the category of online ads that creepily stalk you around the internet after you visit a companies website.
Dynamic Retargeting Ads, however, are essentially Retargeting Ads on steroids. They allow a seller to personalize -- in near real-time -- the ads customers see with products/services they actually looked at while visiting the
Entry points for this type of ad products on many platforms are still in the many-thousands-of-dollars-per-month price range, which is an unrealistic spend for most hospitality managers.
Thankfully, Facebook introduced a version of this ad product on their platform that has virtually no entry price point, making it super ideal for vacation rental or hotel managers looking to deploy this type of targeted advertising. Facebook calls their product Dynamic Ads For Travel.
Here's a simple example of how their platform works.
A Quick Example
Let's say that I am interested in booking a beach front condo in the Destin, Florida area for a fall get away for my family.
During my search I navigate to this listing on HomeAway:

I spend some time researching the listing but get distracted and decide to checkout what's going on in the insane world of Facebook.
I navigate to Facebook and once "the feed" loads, I am immediately presented with an amazingly familiar photo:

And there it is - the beach condo in Destin I was just looking at. Now, amazingly, there are also several other properties in the carousel there if you navigate right or left in the ad that will likely be other properties I've viewed OR
Super rad, right?
So how do hospitality managers set this up for their own brands and marketing efforts? The process is multi-step, but not overly painful. Below is a full step-by-step guide on how to set this all up.
Step One: Create Your Product Catalog
The first step of setting up dynamic travel ads on Facebook is to setup a product catalog on Facebook.
The First step is to log in to your Ads Manager

Next, once you've verified you're using the correct brand account, in the top left part of the screen, click the menu that says "Ads Manager" and then select "Catalogs" from the "Assets" portion of the mega menu.

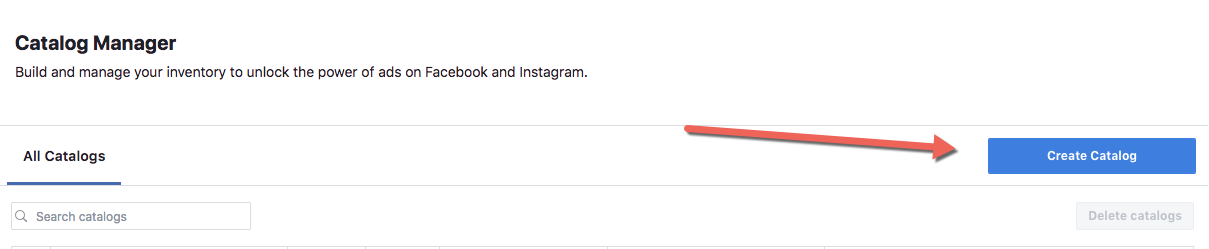
Once you're in the Catalog Manager screen, click the button on the right called "Create Catalog"
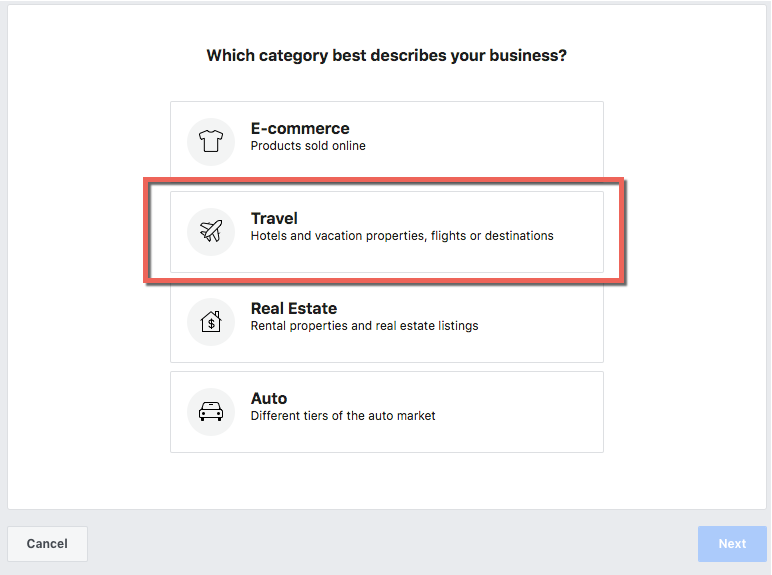
On the next screen you will have a few options for the type of catalog you want to create - click "Travel" as the designation.
Then be sure to click 'Hotels' from the sub-menu that appears:
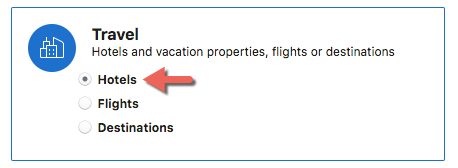
Even though you may be a vacation rental management firm, Facebook does not separate alternative accommodations from hotels, so just pick hotels - it will all work, I promise :-)
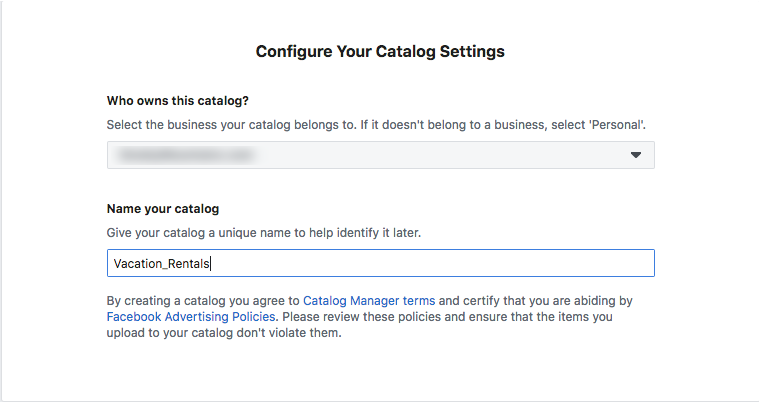
Next, confirm that your brand account will own the catalog and then give it a name. Click 'Create' to create your catalog.
Configuring Your Catalog
Configuring your Catalog has two main parts - adding products to it and then connecting it with an event source (we'll set this up later in the tutorial).
After you successfully created your catalog, Facebook should take you to the "Diagnostics" page. On this page there is an option to 'Add Hotels' - click this button to proceed.

At this point, you will need to prepare a spreadsheet that has all of the information for all of your properties. Realistically, to get started, this may look like a data-dump from your property management system and a little data munging.
Fortunately, Facebook does provide a CSV template for this, though it has a bit of content in it that isn't required. We've stripped off all the optional columns for simplicity and shared a simplified template for you as well.
Important Note: The 'hotel_id' column in the template needs to be an ID from your management system that you will have access to on your website. Each listing on your website site will need to have access to their "internal id" that matches this spreadsheet - more on this later.
Once you've populated the spreadsheet with all the required information, you're ready to upload the spreadsheet!

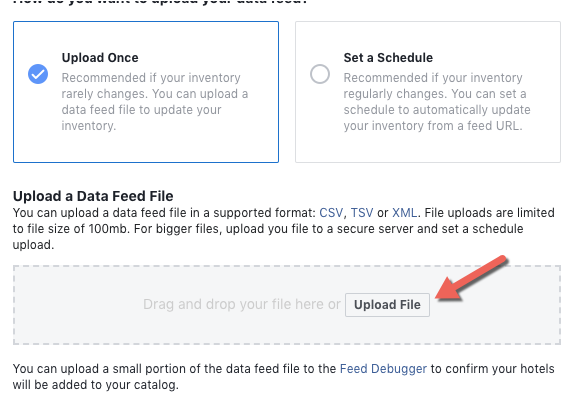
For this example, we recommend selecting "Upload Once" to help you get setup as quickly as possible. We'll cover the "scheduled" option at the end of this post.
After clicking "Upload Once", select your file by clicking the small "Upload File" button:
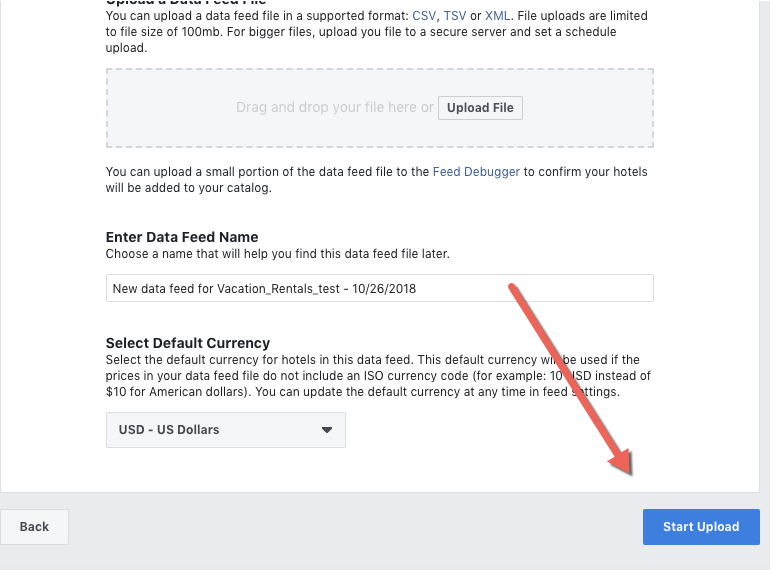
Next, click 'Start Upload' at the bottom:
Facebook will then show you a progress screen that looks like the following.

You can definitely go on to something else if this takes a while - you can always easily get back to this step by navigating to the Catalog Manager and clicking 'Hotel Data Sources'.

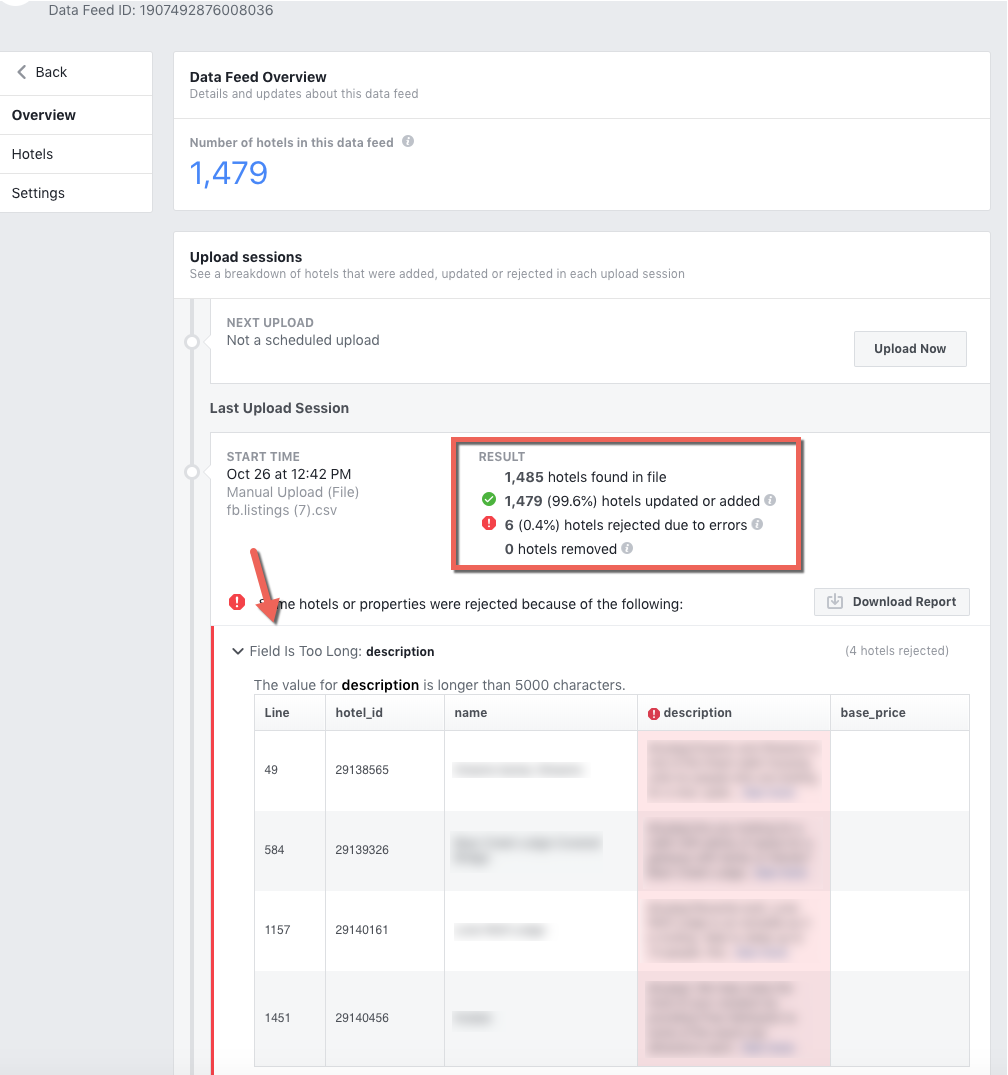
Once this process completes and you go back in to the Hotel Data Source you just created, Facebook will show you how many were successfully uploaded as well as any issues that exist that you should correct.
Step Two: Creating Your Pixel
Once you've got your product catalog setup and looking good, next it's time to create your Facebook Pixel. If you already have a Facebook Pixel setup, you can skip this step.
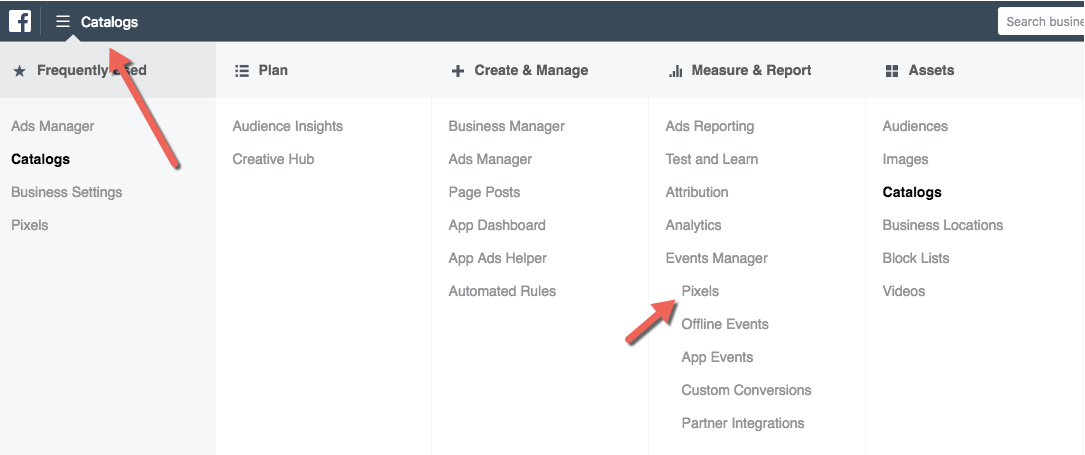
Using the navigational menu in the top left again, you will need to navigate to the 'Pixels' link under the 'Measure & Report' section of the mega-menu.
On the next screen, in the top-right section of the screen click the drop-down labeled "Add Data Source" and click "Facebook Pixel".

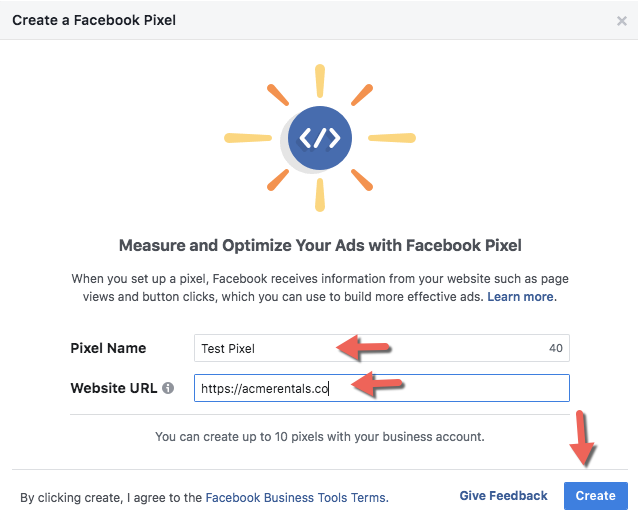
Give your pixel a name, tell it the website you will be using it on and then click 'Create'.
Next, you will have some options regarding the installation of the Pixel on your website. If you have the technical chops to do it yourself, pick "Manually install the Code Yourself", otherwise, you may want to click "Email instructions to Developer" if you have a developer who can do this for you.

For this tutorial, we're taking the manual option. After selecting the 'manual' option, the next screen will show you the Javascript snippet for your pixel that will need to be installed on every page of your website.

Step Three: Customizing Your Pixel with Travel Events
Now - this is the part where things get a little bit tedious, but are absolutely essential to setting this process up correctly. If you are not a developer, make sure to work together with someone who is if you aren't sure how to do this.
Quick Note: Facebook providers great developer documentation for setting this process up on your own website. You can view the documentation here.
There are 4 major events
- Search: The "Search" event should occur on every page where you show a list of all your properties with customers having the ability to filter by dates or amenities.
- ViewContent: The "ViewContent" event is the event you should create on an individual property page. The name is a little confusing.
- InitiateCheckout: The "InitiateCheckout" event is for the page where you expect a customer to enter payment details and "book" the property.
- Purchase: The "Purchase" event is the bottom of the funnel event that should be used after s
Code Examples for each Event
Search Event (Simplified) - Place this on the page templates where property searching happens.

ViewContent (Simplified) - Place this on the page templates where you view a single

InitiateCheckout(Simplified) - Place this on the page where a customer will enter payment details and book a property.

Purchase: (Simplified) - this should go on the page after a

Step Four: Connecting Event sources to your Catalog
The next step is crucially important - without this your ads will never fire.
Navigate back to Facebook > Ads Manager > Catalogs as we did before, only this time, lets click 'Connect Event Source'.
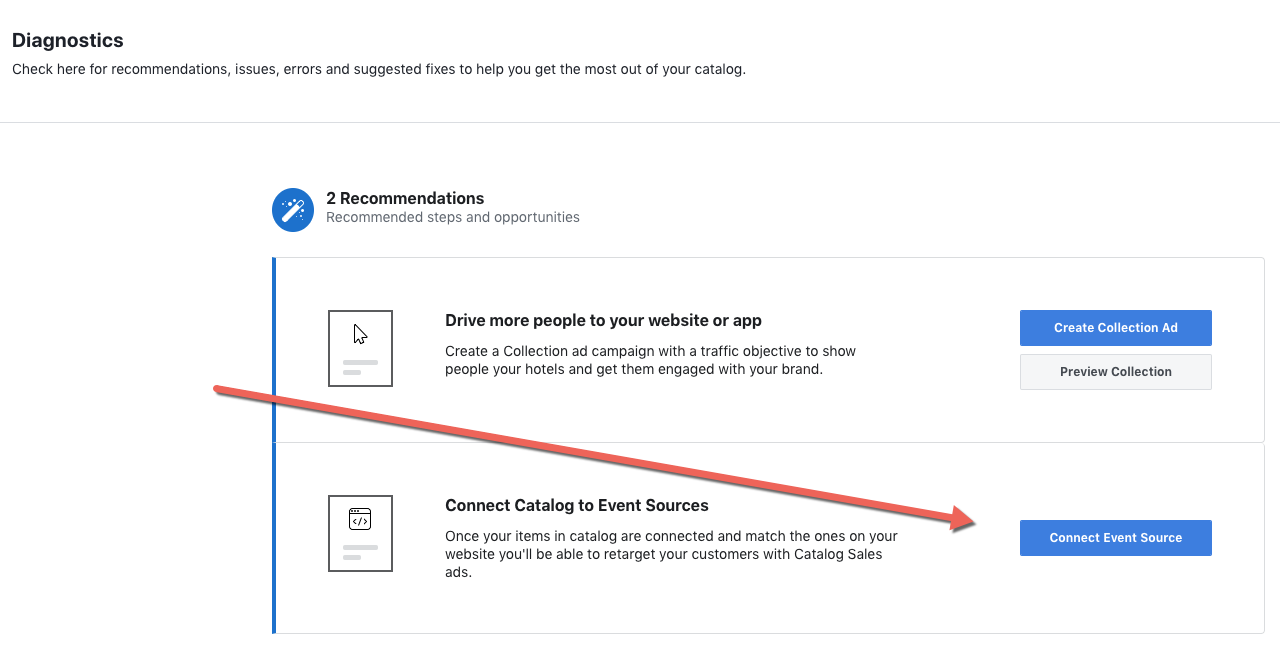
On the following screen, select the pixel that we created earlier in this tutorial, then click 'Save'.

Step Five: Wait.
This part of the process requires patience. Depending on your site traffic volume it could take between a day to a week to gather enough initial data for Facebook to enable the ad creation process.
Final Step: Create a Dynamic Ad
Now that all the setup work is done, it's time to enjoy the fruits of your labor.
Log back in to Ads Manager in Facebook and click 'Create' to create a new ad. The next screen will ask what your "Marketing Objective" is - select "Catalog Sales".

Next, you will need to select which catalog you are wanting to market - be sure to select the catalog that has all of your vacation rental or hotel inventory in it. Click continue.

On the following screens, there are several configuration steps Facebook will take you through. We're going highlight the important ones.
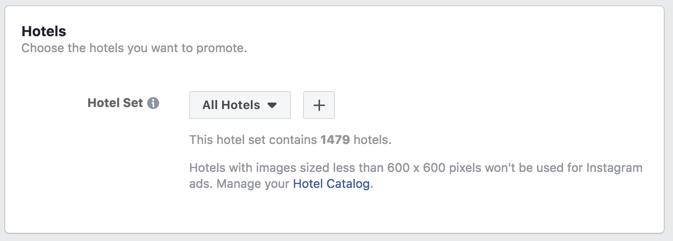
Hotel Set -
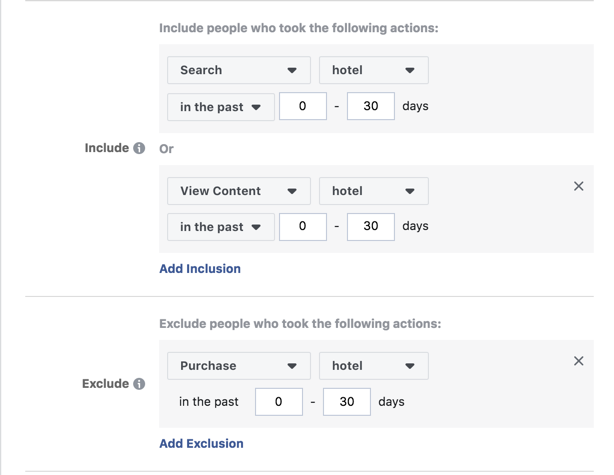
Audience - Without delving
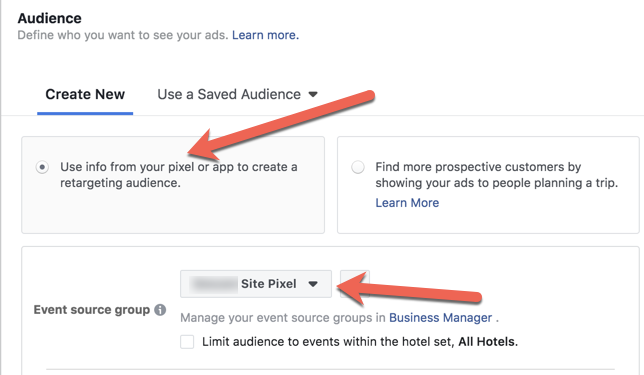
Expert Pro Tip - F
At minimum, we recommend including anyone who has performed a search or viewed as specific listing on your site. But definitely
Ad Format

If you've chosen 'Carousel' as the ad format, your editor should update to look something like this:

This is where you can add/update the copy that Facebook will show alongside your ads.
On the

We highly recommend enabling your pixel for conversion tracking - this will help Facebook better optimize for your campaign objectives and provider richer analytics in your Ads Manager dashboard.
Pro Tips
Wrapping up, I wanted to highlight a few pro tips that can help you really unleash some additional power from this Facebook advertising format.
1.Different Event Bids: Once you get your feet wet with this, you may find that it makes sense to
E.g. - you can bid more for potential customers who made it all the way to InitiateCheckout and less for those who never made it past the Search page.
2. Lifetime Budget
3. Automatic Feed
In your ads manager, by going to Catalog > Hotel Data Sources > Settings, you can setup a scheduled "pull" from a URL you provide. Most implementations simply create a job that builds a CSV file every day that Facebook can pull from on that schedule.

Facebook has some documentation on this process, but if you can build the same CSV that I linked to before via a script, and save it to the same place on a server each night, then it should work just fine.
Wrapping Up
There you go - if you followed this tutorial, you should be ready to serve your own dynamic travel ads at a fraction of the price as other platforms.
Good luck!